Generate a Solidity Verifier
Noir is universal. The witness and the compiled program can be fed into a proving backend such as Aztec's Barretenberg, which can then generate a verifier contract for deployment on blockchains.
This allows for a powerful feature set, as one can make use of the conciseness and the privacy provided by Noir in an immutable ledger. Applications can range from simple P2P guessing games, to complex private DeFi interactions.
Although not strictly in the domain of Noir itself, this guide shows how to generate a Solidity Verifier with Barretenberg and deploy it on the Remix IDE. It is assumed that:
- You will be using Barretenberg as your proving backend
- You will be using an EVM blockchain to verify your proof
- You are comfortable with the Solidity programming language and understand how contracts are deployed on the Ethereum network
- You have Noir installed and you have a Noir program. If you don't, get started with Nargo and the example Hello Noir circuit
- You are comfortable navigating RemixIDE. If you aren't or you need a refresher, you can find some video tutorials here that could help you.
Rundown
Generating a Solidity Verifier with Barretenberg contract is actually a one-command process. However, compiling it and deploying it can have some caveats. Here's the rundown of this guide:
- How to generate a solidity smart contract
- How to compile the smart contract in the RemixIDE
- How to deploy it to a testnet
Step 1 - Generate a contract
This is by far the most straightforward step. Just run:
nargo compile
This will compile your source code into a Noir build artifact to be stored in the ./target directory. From here on, it's Barretenberg's work. You can generate the smart contract using the commands:
# Generate the verification key. You need to pass the `--oracle_hash keccak` flag when generating vkey and proving
# to instruct bb to use keccak as the hash function, which is more optimal in Solidity
bb write_vk -b ./target/<noir_artifact_name>.json -o ./target --oracle_hash keccak

# Generate the Solidity verifier from the vkey
bb write_solidity_verifier -k ./target/vk -o ./target/Verifier.sol
replacing <noir_artifact_name> with the name of your Noir project. A Verifier.sol contract is now in the target folder and can be deployed to any EVM blockchain acting as a verifier smart contract.
You can find more information about bb and the default Noir proving backend on this page.
Step 2 - Compiling
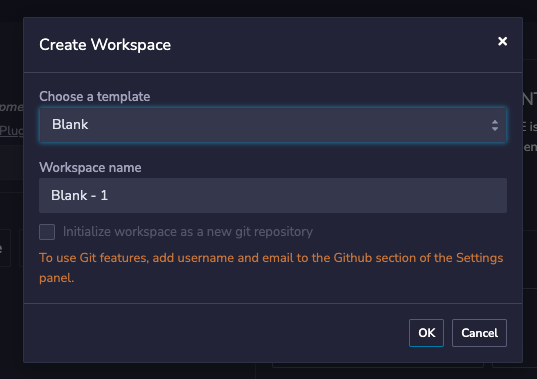
We will mostly skip the details of RemixIDE, as the UI can change from version to version. For now, we can just open Remix and create a blank workspace.
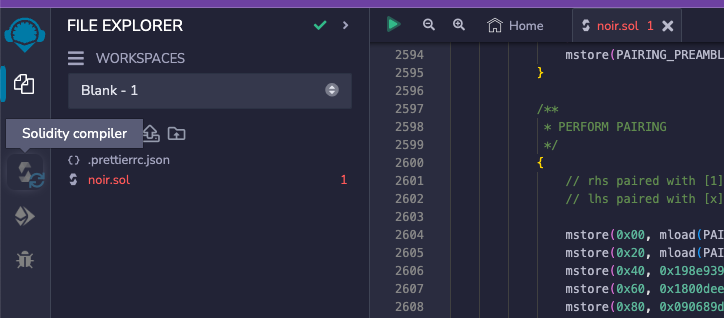
We will create a new file to contain the contract Nargo generated, and copy-paste its content.
You'll likely see a warning advising you to not trust pasted code. While it is an important warning, it is irrelevant in the context of this guide and can be ignored. We will not be deploying anywhere near a mainnet.
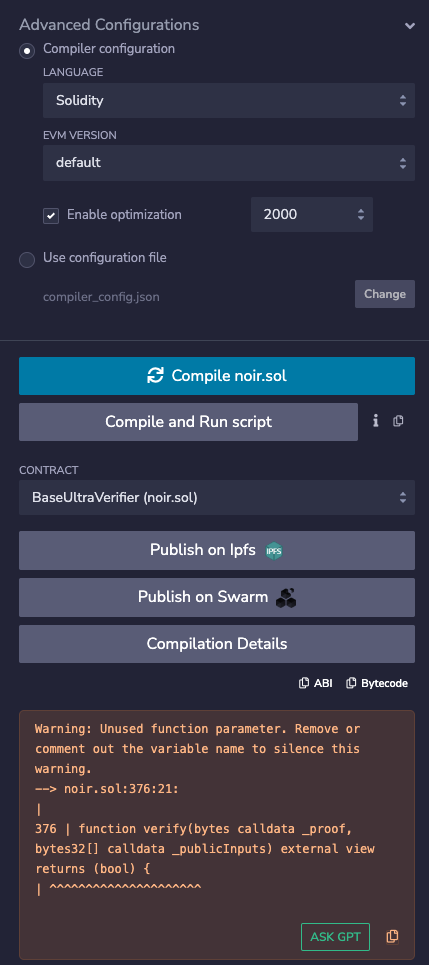
To compile our the verifier, we can navigate to the compilation tab:
Remix should automatically match a suitable compiler version. However, hitting the "Compile" button will most likely tell you the contract is too big to deploy on mainnet, or complain about a stack too deep:
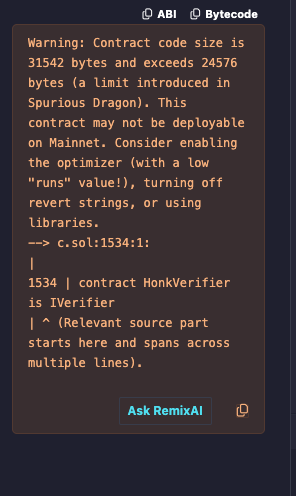
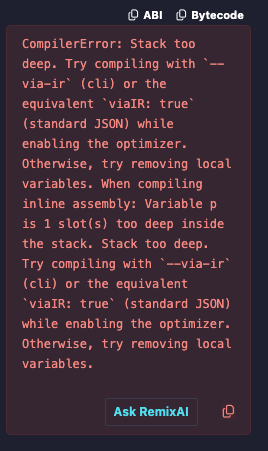
To avoid this, you can just use some optimization. Open the "Advanced Configurations" tab and enable optimization. The default 200 runs will suffice.
Step 3 - Deploying
At this point we should have a compiled contract ready to deploy. If we navigate to the deploy section in Remix, we will see many different environments we can deploy to. The steps to deploy on each environment would be out-of-scope for this guide, so we will just use the default Remix VM.
Looking closely, we will notice that our "Solidity Verifier" is composed on multiple contracts working together. Remix will take care of the dependencies for us so we can simply deploy the Verifier contract by selecting it and hitting "deploy":
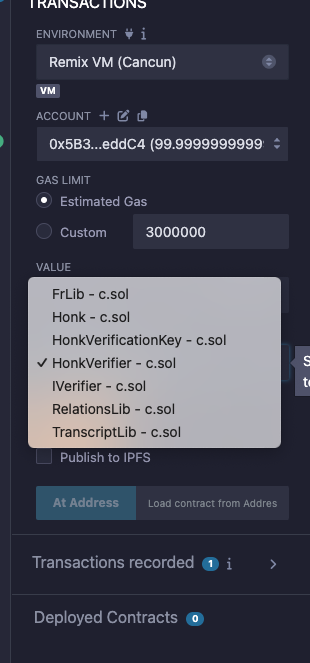
A contract will show up in the "Deployed Contracts" section.
Step 4 - Verifying
To verify a proof using the Solidity verifier contract, we call the verify function:
function verify(bytes calldata _proof, bytes32[] calldata _publicInputs) external view returns (bool)
First generate a proof with bb. We need a Prover.toml file for our inputs. Run:
nargo check
This will generate a Prover.toml you can fill with the values you want to prove. We can now execute the circuit with nargo and then use the proving backend to prove:
nargo execute <witness-name>
bb prove -b ./target/<circuit-name>.json -w ./target/<witness-name> -o ./target --oracle_hash keccak --output_format bytes_and_fields
We used --oracle_hash keccak to instruct bb to generate proof with keccak hash function, as that is more efficient in Solidity and our generated Solidity verifier expects a keccak proof.
To verify with Remix, you can pass the proof bytes as a hex string and the public inputs as a bytes32[] to the verify function.
# Print the proof bytes as a hex string
echo -n "0x"; cat ./target/proof | od -An -v -t x1 | tr -d $' \n'
Since we used --output_format bytes_and_fields flag, you will have a target/public_inputs_fields.json file containing an array of public inputs in hex format, which can be directly pasted into Remix.
A programmatic example of how the verify function is called can be seen in the example zk voting application here:
function castVote(bytes calldata proof, uint proposalId, uint vote, bytes32 nullifierHash) public returns (bool) {
  // ...
  bytes32[] memory publicInputs = new bytes32[](4);
  publicInputs[0] = merkleRoot;
  publicInputs[1] = bytes32(proposalId);
  publicInputs[2] = bytes32(vote);
  publicInputs[3] = nullifierHash;
  require(verifier.verify(proof, publicInputs), "Invalid proof");
A circuit doesn't have the concept of a return value. Return values are just syntactic sugar in Noir.
Under the hood, the return value is passed as an input to the circuit and is checked at the end of the circuit program.
For example, if you have Noir program like this:
fn main(
    // Public inputs
    pubkey_x: pub Field,
    pubkey_y: pub Field,
    // Private inputs
    priv_key: Field,
) -> pub Field
the verify function will expect the public inputs array (second function parameter) to be of length 3, the two inputs and the return value.
Passing only two inputs will result in an error such as PublicInputsLengthWrong().
In this case, the inputs parameter to verify would be an array ordered as [pubkey_x, pubkey_y, return].
You can pass structs to the verifier contract. They will be flattened so that the array of inputs is 1-dimensional array.
For example, consider the following program:
struct Type1 {
  val1: Field,
  val2: Field,
}

struct Nested {
  t1: Type1,
  is_true: bool,
}

fn main(x: pub Field, nested: pub Nested, y: pub Field) {
  //...
}
The order of these inputs would be flattened to: [x, nested.t1.val1, nested.t1.val2, nested.is_true, y]
The other function you can call is our entrypoint verify function, as defined above.
It's worth noticing that the verify function is actually a view function. A view function does not alter the blockchain state, so it doesn't need to be distributed (i.e. it will run only on the executing node), and therefore doesn't cost any gas.
This can be particularly useful in some situations. If Alice generated a proof and wants Bob to verify its correctness, Bob doesn't need to run Nargo, NoirJS, or any Noir specific infrastructure. He can simply make a call to the blockchain with the proof and verify it is correct without paying any gas.
It would be incorrect to say that a Noir proof verification costs any gas at all. However, most of the time the result of verify is used to modify state (for example, to update a balance, a game state, etc). In that case the whole network needs to execute it, which does incur gas costs (calldata and execution, but not storage).
Compatibility with different EVM chains
Barretenberg proof verification requires the ecMul, ecAdd, ecPairing, and modexp EVM precompiles. You can deploy and use the verifier contract on all EVM chains that support the precompiles.
EVM Diff provides a great table of which EVM chains support which precompiles: https://www.evmdiff.com/features?feature=precompiles
Some EVM chains manually tested to work with the Barretenberg verifier include:
- Optimism
- Arbitrum
- Polygon PoS
- Scroll
- Celo
- BSC
- Blast L2
- Avalanche C-Chain
- Mode
- Linea
- Moonbeam
Meanwhile, some EVM chains chains manually tested that failed to work with the Barretenberg verifier include:
- zkSync ERA
- Polygon zkEVM
Pull requests to update this section is welcome and appreciated if you have compatibility updates on existing / new chains to contribute: https://github.com/noir-lang/noir
What's next
Now that you know how to call a Noir Solidity Verifier on a smart contract using Remix, you should be comfortable with using it with some programmatic frameworks. You can find other tools, examples, boilerplates and libraries in the awesome-noir repository.
You should also be ready to write and deploy your first NoirJS app and start generating proofs on websites, phones, and NodeJS environments! Head on to the NoirJS tutorial to learn how to do that.